Easy steps to setting up Live Edit (Hot Reload) in Webstorm and making your web development experience much smoother.
1. Create a new project
Create a new project in Webstorm and add an index.html file we will use for our tests.
Insert some HTML code
|
and launch the page in your browser with the Chrome button on the top right of the html editing area in Webstorm.
2. Live Edit Setup
Good start ! Now let’s setup Live Edit in Webstorm so that anytime a change is made in Webstorm, the changes are automatically picked up by the browser.
a. Create a debug configuration
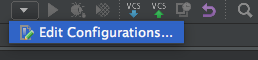
In the top right, click Edit Configurations to add a new configuration:
In the next screen:

- Click the
+button to add a new Config and choose ‘JavaScript Debug’ [1] - Choose a name for your configuration, for examples Live Edit [2]
- Click on the
...next to URL and select yourindex.htmlfile [3] - Select Chrome in the Browser Dropdown [4]
- Click Apply
b. Launch the debug session
Click on little Bug icon next to your configuration on the top right, next to your configuration name.
If this your first time using Live Edit, Webstorm will ask you to install a Chrome Plugin

Click the link a proceed to install that plugin in Chrome.
Restart the debugging session from Webstorm and you are ready to go. Try to select elements in the .html file and see how any change has an immediate effect in Chrome.
c. Additional Configuration
At this point, everything is working great but you might find that sometimes some changes are not taken into account.
Go to Webstorm Settings and the Live Edit Section and use the following values:
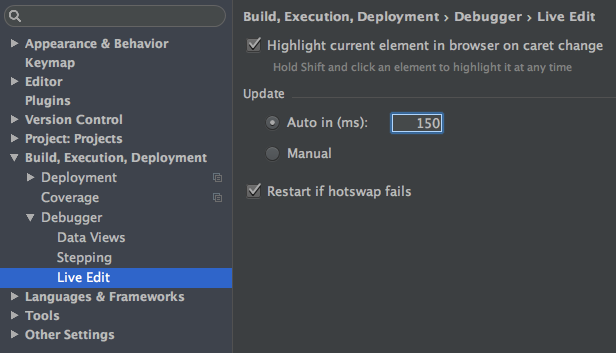
- Update: auto - 15ms
- Check the ‘Restart if hotswap fails’ box.
Enjoy :)
